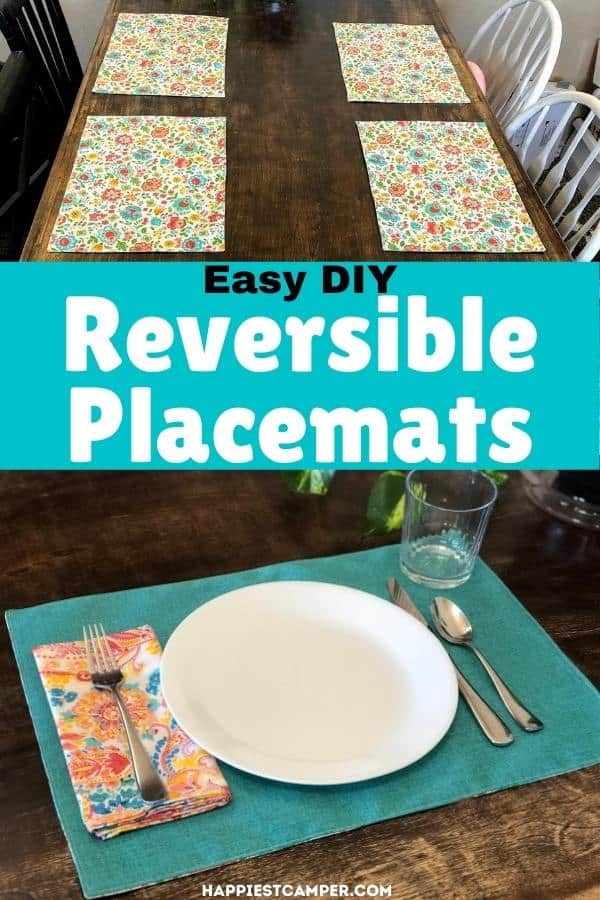
Have you ever thought about how useful placemats truly are? It’s probably not high up on your thoughts to ponder list, but if you have kids then this DIY Reversible Placemats Sewing Tutorial is for you! These cute and functional placemats will save your table and make cleaning up a cinch! A few simple steps and you’ll have some custom placemats that not only look super trendy but are so functional it will have you wondering why you haven’t made them before now!

This is a great sewing project for beginners. This quick and easy project is a fun way to add some decorative flair to your table for cheap! This tutorial makes 6 placemats for around $20.00, but you can scale up or down for whatever size table you have. You can freshen up the look of your space in about 20 minutes! Let’s get started!
What You’ll Need:
- 2 yards each of two coordinating fabrics (thicker, home décor type fabrics work best for this, but cotton can also be used)
- Interfacing (2 yards)
- Thread
- Chopstick or turning tool
- Scissors
- Sewing Pins or clips
- Sewing machine
- Optional: Rotary cutter and mat
- Iron/ironing board
How To Make DIY Reversible Placemats

To begin with, as with most sewing projects, you will want to wash, dry, and iron your fabrics. This way, your fabrics are less likely to shrink and mess up your stitches the first couple of times you wash them. I always wash and dry my fabrics prior to cutting them so that any fabric scraps that I have left over are ready to sew for my next DIY project!

After your fabric is washed, dried, and ironed, measure and cut your fabric. You will need one – 15” x 21” rectangle of each fabric for each diy reversible placemat you plan on making. I am making 6 placemats, so I have cut 6 pieces from each fabric.

Next, lay out the interfacing on your ironing board. Interfacing helps add rigidity to your placemats and help them keep their shape. With the wrong side of one fabric facing down – towards the interfacing – lay the fabric on top of the interfacing. (I did this on my cotton fabric) Using an iron set to dry (no steam!), press the fabric down to the interfacing. Press each small section for about 6 seconds each before picking up the iron and moving it to another spot. Don’t swipe the iron across the fabric, rather lift and move it instead. *Follow the instructions on the interfacing to ensure the best practice. Once you are finished pressing, cut the excess interfacing off to match the size of the fabric rectangle. These diy reversible placemats are coming together!

Now, place the interface-backed piece of fabric on top of the other rectangle of fabric, making sure the right sides of the fabric are touching. Be sure all sides line up, then clip or pin around the edges to hold.

Leaving a 4”-5” gap for turning, stitch around the edge of the rectangles with a 1/4” seam allowance. Clip the corners, making sure you don’t cut your fresh stitches. We are now about halfway through with our DIY Reversible Placemat Sewing Tutorial.

Through the hole you left, turn the placemat right side out. Press out all edges and corners carefully with a chopstick or turning tool, then press for crisp edges.

Fold in the edges of the hole, then press and clip the hole you just pulled the placemat through.

Using 1/8” seam allowance (or closer), top stitch all the way around the placemat. Be sure to backstitch at the beginning and end of your stitches for extra strength. Also, be sure that your hole edges are caught in your stitching to close up the hole.

Repeat these step for all 6 diy reversible placemats (or however many you wish!) As you saw, this sewing project is a quick and easy way to project your table and add some style to your home. Placemats are life savers with kids and help make clean up easier. You can make these as simple or elegant as you wish depending on your fabric choices. You can even customize them with some embroidery as your sewing skills improve. And, don’t forget that they are reversible! You can change the look of your space with a simple flip! These DIY Reversible Place mats would make great gifts for some friends and family! Plus, these placemats would go great with some handmade cloth napkins!

Now you have beautiful reversible placemats that are the style and colors you want. And, you didn’t have to pay a fortune for them. These placemats will help keep your table clean and looking nice for many meals! The best part is, you can simply throw these reversible placemats in the wash when they get dirty just like the cloth napkins! Less waste and more savings!
If you liked how to make diy reversible placemats sewing tutorial, make sure to pin it to your favorite Pinterest board or share it with friends on social media. If you decide to make this simple project on your own, make certain that you take a picture afterward and tag us on social media as we love seeing the fabrics and color choices that people use!
DIY Reversible Placemat Sewing Tutorial

Does your table look drab? Do you need some color or fun fabric with patterns to give your table a fresh look? This sewing tutorial will show you how to make cute and functional reversible placemats that will not only spruce up your table but will help with cleaning up crumbs and messes that naturally happen!
Tools
Instructions
- Wash, dry, and iron the fabric.
- Measure and cut your fabric. You will need: One 15” x 21” rectangle of each fabric for each placemat.
- Lay out the interfacing on your ironing board.
- With the wrong side of one fabric facing down – towards the interfacing – lay the fabric on top of the interfacing.
- Using an iron set to dry (no steam!), press the fabric down to the interfacing.
- Cut the excess interfacing off to match the size of the fabric rectangle.
- Now, place the interface-backed piece of fabric on top of the other rectangle of fabric, making sure the right sides of the fabric are touching.
- Clip or pin around the edges to hold.
- Leaving a 4”-5” gap, stitch around the edge of the rectangles with a 1/4” seam allowance.
- Clip the corners
- Through the hole you left, turn the fabric right side out.
- Push out all edges and corners carefully with a chopstick or turning tool.
- Press for the edges.
- Fold in the edges of the hole, then press and clip the hole.
- Using 1/8” seam allowance (or closer), top stitch all the way around the placemat.
- Be sure to backstitch at the beginning and end of your stitches. Also, be sure that your hole edges are caught in your stitching to close up the hole.
- Repeat for all 6 placemats.
Recommended Products
As an Amazon Associate and member of other affiliate programs, I earn from qualifying purchases.
-
 SINGER 07051 Pearlized Head Straight Pins, Size 24, 120-Count, White
 -
 Clover 3183 50-Piece Wonder Clips, Assorted Colors
 -
 Best Beginner Sewing Machines
 -
 Fiskars Crafts 95237097J Rotary Sewing Cutting Set (3 Piece), Grey
 -
 LIVINGO Premium Tailor Scissors Heavy Duty Multi-Purpose Titanium Coating Forged Stainless Steel Sewing Fabric Leather Dressmaking Softgrip Shears Professional Crafting (9.5 INCH)
