Today on HappiestCamper, we show you How To Sew A Double Zipper Coin Purse! How cute is this?! This little purse is perfect for cash and coins or any other small items you want to keep with you. It also features a keyring so you can keep a few keys with you while still keeping this little purse compact. I love little sewing projects like this because you can knock them out in less than an hour and you are left with something practical you can use right away. You could also make several of these and give them away or even sell them. I picked out some cute baby yoda fabric that I linked below, but you could use a solid color or whatever print you like. This sewing project is great for beginners wanting to hone their skills with zippers. You can make this little purse for a fraction of the cost of buying one in-store, This is also a great scrap buster project if your scrap bin is starting to overflow.

So, gather up your sewing supplies and let’s get started on this cute double zip coin purse!

What You’ll Need:

- 1/4 Yard of Main Fabric
- 1/4 Yard of Accent Fabric
- 1/4 Yard Lining Fabric
- Pellon SF101 Interfacing
- (1) Olive 7”+ nylon zipper for main top opening
- (1) Khaki 5”+ nylon zipper for front pocket
- 1” split ring
- Thread
- Sewing Pins or clips
- Scissors
- Turning tool
- Disappearing fabric marker
- Rotary cutter, cutting mat, & ruler
- Iron and ironing board or iron mat
Cut List:
Main Fabric:
- (1) 6 ¼” W x 1 ¾” T for front pocket panel top (INTERFACE THIS PIECE)
- (1) 6” W x 4 ¼” T for back panel (INTERFACE THIS PIECE)
- (1) 2” x 2” for ring tab
- (2) 2 ½” x 2” front zip tabs
Accent Fabric:
- (1) 6 ¼” W x 2 ¾” T for front pocket panel bottom (INTERFACE THIS PIECE)
Lining Fabric:
- (1) 6 ¼” W x 1 ¾” T for front pocket panel top
- (1) 6 ¼” W x 2 ¾” T for front pocket panel bottom
- (1) 6” W x 4 ¼” T for front pocket back panel
- (2) 6” W x 4” T main pouch lining
Interfacing:
- (1) 6” W x 1 ½” T for front pocket panel top
- (1) 6” W x 2 ½” T for front pocket panel bottom
- (1) 6” W x 4” T for back panel
How To Sew A Double Zipper Coin Purse

Start this how to sew a double zip coin purse sewing tutorial by washing, drying, and ironing your fabric. This helps your fabric be soft and easier to cut. It also acts as a preshrink for your fabric so that your stitches don’t get messed up the first time you wash this little coin purse. Once you have done that, cut all pieces needed as listed above. Iron on SF101 Interfacing onto the 3 pieces as noted above.

Once you have done that, take your 2”x2” ring tab piece and place it wrong side up. Fold it in half and press it so that you have a crease down the middle. Now open and fold each side into the middle crease so it looks like this.

Now on this how to sew a double zip coin purse sewing tutorial, fold on the center crease so that the top and bottom edges meet. You will end up with a piece that is ½” wide and 2” long. Topstitch along both long edges about ⅛” in from the edge. Set aside. You won’t need this piece until the end.

Next, we will work on the smaller zipper. Trim both metal stops off the 5” zipper and add tabs to each side using your preferred method so that you end up with a tabbed zipper that is at least 6 ¼” long. Trim excess from the top and bottom of tabs so that the entire strip matches the width of the zipper.

Now on this how to sew a double zip coin purse sewing tutorial, place the front pocket panel bottom piece right side up. Align the 6 ¼” tabbed zipper you just made with the top of the front pocket panel bottom piece with the zipper face down. Place the front pocket panel bottom lining piece on top of the zipper, also right side face down. Use a zipper foot to sew all 3 pieces together using a ¼” seam allowance.

Press both sides open with right sides facing out and topstitch using ⅛” seam allowance.
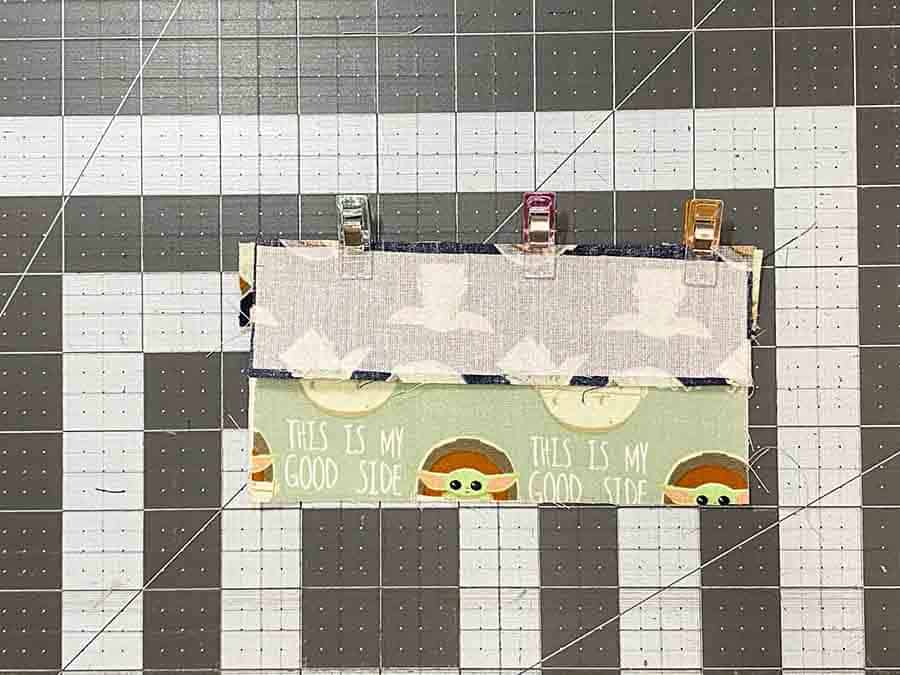
Align the bottom of the front pocket panel top piece (right side face down) with the zipper tape edge of the panel you just made (right side facing up). Clip in place.

Next on this how to sew a double zip coin purse sewing tutorial, flip this over so that the lining side is now face up. Do the same as above with the front pocket panel top lining piece. Place it face down, aligning with the open edge of the zipper tape. Clip in place and sew all 3 pieces together using a ¼” seam allowance.
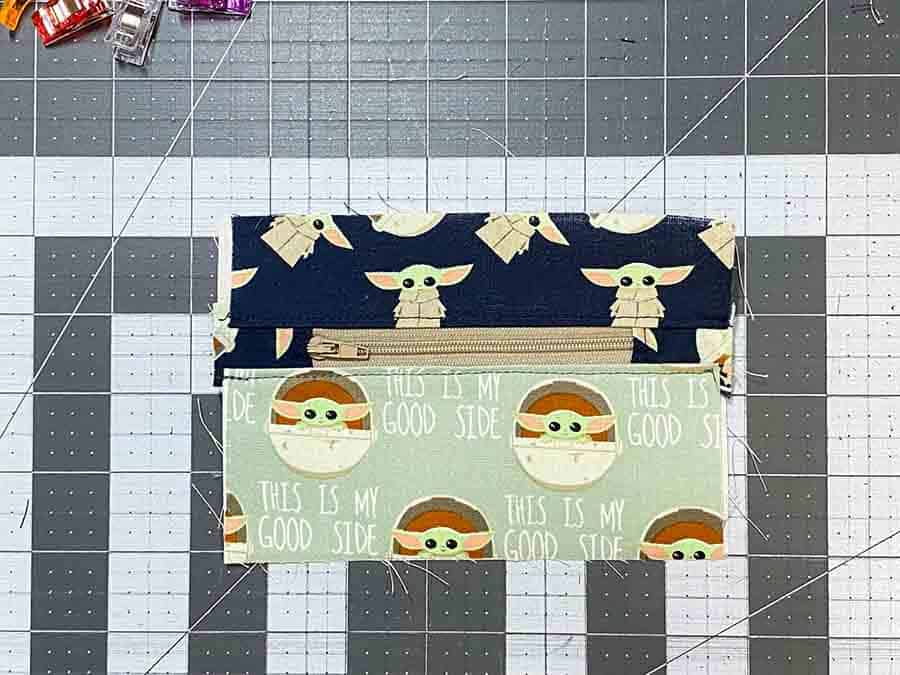
Press both top sides open like before with the right sides facing out and topstitch using ⅛” seam allowance.

Trim this front panel piece you just made so that it measures 6” wide by 4 ¼” tall. Place this on top of the front pocket back panel lining piece, both face up.

Now on this how to sew a double zip coin purse sewing tutorial, baste together around all 4 edges using ⅛” seam allowance. You now have a complete front panel piece with a functioning zippered pocket.

Place the main zipper face down along the top edge of the panel you just made. We are about halfway through this how to sew a double zip coin purse sewing tutorial!

Place one main pouch lining piece face down on top of that.

Now on this how to sew a double zip coin purse sewing tutorial, sew all three pieces together using ¼” seam allowance and zipper foot. Just like before, press open and topstitch with ⅛” seam allowance.

Place the back panel main fabric piece on top, face down aligning the top edge with the open edge of the zipper tape below. Clip in place.

Flip this over so that the lining side is now face up. Place the second main lining piece face down also aligning with the open edge of the zipper tape. Clip in place.

Sew all 3 pieces together using a ¼” seam allowance. Open both sides, press and topstitch like before so that now you have a front panel with lining along with a back panel with lining on either side of the main zipper.

Move the zipper pull into the center and then stitch the zipper tape together at that end.

Trim the zipper tape on both sides so that it is even with the fabric. Match the lining pieces together (right sides together) and match the outer pieces together (the back panel and the front pocket panel piece you made) also right sides together. Mark for a 2” opening on the lining pieces. Clip all the way around.

Fold the ring tab piece you made earlier in half and place between the outer pieces close to the zipper tab. The raw edges should be out with the lop part being inside the sandwich.

Sew all the way around (except for the 2” space for turning) using a ¼” seam allowance. Clip the corners. Put your fingers inside the hole and pull the outside piece through. Keep going until your piece is now right side out. Use a tool to gently press out all 4 corners. Press the exterior pieces.

Next on this how to sew a double zip coin purse sewing tutorial, align the lining hole pieces that are folded in and press so they match as best as you can. Mark just past the opening on each side so that you will be able to easily see where to start and stop sewing the hole shut.

Sew the turn hole shut as close to the edge as possible. Push the lining into the exterior pieces and push in the corners with your fingers.

Close the zipper and attach the 1” split ring to the tab. You’re all done!

If you liked learning how to sew a double zipper coin purse, make sure to pin it to your favorite Pinterest board or share it with friends on social media. If you decide to make this simple project on your own, make certain that you take a picture afterward and tag us on social media as we love seeing the fabrics and color choices that people use!
How To Sew A Double Zip Coin Purse

Make your own double zip coin purse! This super cute little purse is great for carrying cash and coins or other small items .
Materials
Tools
- Sewing Clips
- Scissors
- Turning tool
- Disappearing fabric marker
- Rotary cutter, cutting mat, & ruler
- Iron and ironing board or iron mat
Instructions
- Cut all pieces needed as listed above. Iron on SF101 Interfacing onto the 3 pieces as noted.
- Take your 2”x2” ring tab piece and place it wrong side up. Fold it in half and press so that you have a crease down the middle. Now open and fold each side in to the middle crease so it looks like this.
- Now fold on the center crease so that the top and bottom edges meet. You will end up with a piece that is ½” wide and 2” long. Topstitch along both long edges about ⅛” in from the edge. Set aside. You won’t need this piece until the end.
- Trim both metal stops off the 5” zipper and add tabs to each side using your preferred method so that you end up with a tabbed zipper that is at least 6 ¼” long. Trim excess from top and bottom of tabs so that the entire strip matches the width of the zipper.
- Place the front pocket panel bottom piece right side up. Align the 6 ¼” tabbed zipper you just made with the top of the front pocket panel bottom piece with the zipper face down. Place the front pocket panel bottom lining piece on top of the zipper, also right side face down. Use a zipper foot to sew all 3 pieces together using a ¼” seam allowance.
- Press both sides open with right sides facing out and topstitch using ⅛” seam allowance.
- Align the bottom of the front pocket panel top piece (right side face down) with the zipper tape edge of the panel you just made (right side facing up). Clip in place.
- Flip this over so that the lining side is now face up. Do the same as above with the front pocket panel top lining piece. Place it face down, aligning with the open edge of the zipper tape. Clip in place and sew all 3 pieces together using a ¼” seam allowance.
- Press both top sides open like before with the right sides facing out and topstitch using ⅛” seam allowance.
- Trim this front panel piece you just made so that it measures 6” wide by 4 ¼” tall. Place this on top of the front pocket back panel lining piece, both face up.
- Baste together around all 4 edges using ⅛” seam allowance. You now have a complete front panel piece with a functioning zippered pocket.
- Place the main zipper face down along the top edge of the panel you just made.
- Place one main pouch lining piece face down on top of that
- Sew all three pieces together using ¼” seam allowance and zipper foot. Just like before, press open and topstitch with ⅛” seam allowance.
- Place the back panel main fabric piece on top, face down aligning the top edge with the open edge of the zipper tape below. Clip in place.
- Flip this over so that the lining side is now face up. Place the second main lining piece face down also aligning with the open edge of the zipper tape. Clip in place.
- Sew all 3 pieces together using a ¼” seam allowance. Open both sides, press and topstitch like before so that now you have a front panel with lining along with a back panel with lining on either side of the main zipper.
- Move the zipper pull into the center and then stitch the zipper tape together at that end.
- Trim the zipper tape on both sides so that it is even with the fabric. Match the lining pieces together (right sides together) and match the outer pieces together (the back panel and the front pocket panel piece you made) also right sides together. Mark for a 2” opening on the lining pieces. Clip all the way around.
- Fold the ring tab piece you made earlier in half and place between the outer pieces close to the zipper tab. The raw edges should be out with the lop part being inside the sandwich.
- Sew all the way around (except for the 2” space for turning) using a ¼” seam allowance. Clip the corners. Put your fingers inside the hole and pull the outside piece through. Keep going until your piece is now right side out.
- Use a tool to gently press out all 4 corners. Press the exterior pieces.
- Align the lining hole pieces that are folded in and press so they match as best as you can. Mark just past the opening on each side so that you will be able to easily see where to start and stop sewing the hole shut.
- Sew the turn hole shut as close to the edge as possible. Push the lining into the exterior pieces and push in the corners with your fingers.
- Close the zipper and attach the 1” split ring to the tab. You’re all done!
Good Morning, I love all of your posts. I have a question completely off topic. I am needing to get a new sewing machine. I want to be able to sew vinyl and heavier materials, duck cloth and such. Anyway, I am wanting to know what you would recommend.
Thank You,
Terri M.