You may not be aware, but many sewing machines will sew a button back on your clothes for you! It is a little bit of a process and takes some patience, but we will walk you through the steps to get those buttons back on your clothes in this How to Sew a Button with a Brother Sewing Machine Tutorial. If you prefer to sew by hand you can check out our other posts How to Sew a Two-hole Button by Hand or How to Sew a Four-hole Button by Hand.
Ok, so let’s get started with the process of getting your buttons back on your clothes. This process includes your sewing machine so you will want to have that out, including the instruction manual that comes with your machine! This tutorial is specifically for a Brother sewing machine, but the process should be similar for other machines. If you need to sew a buttonhole as well then check out this tutorial on how to sew a buttonhole with a brother sewing machine. Be sure to review your manual for exact directions for your specific machine!

Sewing machine disclaimer:
Every sewing machine has different settings, features, and tools. Your machine may differ slightly from this tutorial. This should be the general “gist” of how to use your machine to sew a button, but please refer to your specific manual for directions for your individual machine. This was sewn on a Brother CS6000i – a wonderful, budget-friendly option for a sewing machine!
What You’ll Need:

This tutorial is shown with a scrap piece of fabric and a spare button. It is sometimes helpful to practice with spare materials before attempting the final project. In our other tutorial, we show you how to sew a buttonhole with a Brother sewing machine. Be sure to check that out as well to complete all your button projects!

Sewing machine button directions: (*This is for a 4 hole button.) Again, each machine will have different specific instructions for this. Please reference your manual to ensure you follow those so as not to break your machine.

First, measure the width between two holes on your button. You’ll need to set your machine stitch width to this measurement. Make a note of this measurement for this purpose.

On your machine, there should be a switch to lower the feed dogs underneath the presser foot. Mine is located on the backside of the machine. Switch this over so the feed dogs lower.

Your machine should come equipped with a button foot. It will look like this. Go ahead and attach this to your presser foot.

The next step in how to sew a buttonhole with a Brother sewing machine is to place your button where you’d like it to go on your fabric. Then carefully slide the fabric and button underneath your presser foot. On a four-hole button, we will be sewing the two holes closest to you first. Position these underneath the presser foot directly under the needle. The holes will be in between the side “teeth” of the button foot. Lower your presser foot.

Go ahead and set your machine to the free quilting zig-zag stitch as shown in the picture (or whatever your machine’s button setting is as indicated by your manual). Also, set the stitch width to your measurement from step 2, and set the stitch length to zero.

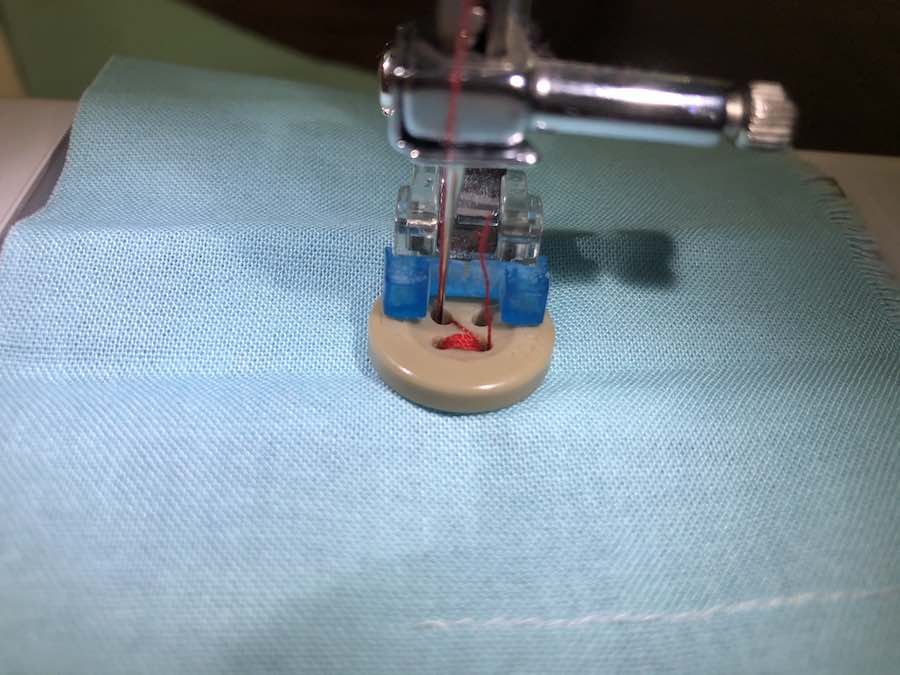
Now that we are about half way through this tutorial to sew a button with a Brother Sewing Machine, you will carefully use your hand crank to lower the needle down into one hole.

After the needle comes back up, keep cranking to see it go into the other hole. If it is too wide or too narrow, you’ll need to adjust your stitch width to ensure it will fit. Once you get it correct, you can use your pedal to continue
stitching. (*This part can be dangerous if you attempt to use the pedal and go fast before ensuring the width is correct. The needle can break and fly off, potentially injuring you. Please be sure the width is correct by hand cranking before using the pedal!) Continue stitching for about 10 seconds.
The next step in how to sew a buttonhole with a Brother sewing machine is to make sure your needle is in the up position, slide your button forward to where the rear two holes line up in the presser foot. The width should be the same, so you won’t have to mess with the settings for that. Again, hand crank to lower the needle into the first hole – it will be the opposite hole from where you started! You should see a little “z” shape in the thread where it crosses over. Continue stitching the rear buttonholes for about 10 seconds.

Once you are finished, be sure to do a few reinforcement stitches with that button on your machine. Then you can snip off the thread (leave a couple of inches as a tail!) and remove the fabric from the machine.

Next, carefully pull the top thread to the bottom of the fabric (you’ll be able to find this close to the knot the machine tied off on the bottom). Locate the bobbin thread and tie the two thread ends together in a knot.

Finally, close to the knot you just tied, snip the threads off.

You have just completed sewing a button on with your sewing machine! It wasn’t too complicated or difficult! Now if you need to sew a buttonhole with your sewing machine check out our buttonhole tutorial. We hope that you have enjoyed learning something new and that it helps you with many of your current and future sewing projects! Now that you have familiarized yourself with the process for sewing a button on with your sewing machine you are ready to tackle any project that needs a button with the use of your sewing machine! Be sure to check out our other tutorial on How to Sew a Buttonhole with a Brother Sewing Machine.

If you liked this how to sew a button with a Brother sewing machine tutorial, make sure to pin it to your favorite Pinterest board or share it with friends on social media. If you decide to use this tutorial, take a picture afterward and tag us on social media as we love seeing the how others use these tutorials.
How to Sew a Button with a Brother Sewing Machine

Perhaps you already know how to sew a button back on by hand, but do you know how to use your sewing machine to sew on a button? You can do two and four-hole buttons with most modern sewing machines! This will have all your missing buttons back on in no time!
Instructions
- Please reference your manual for your sewing machine to ensure you follow the instructions for how to sew a button so as not to break your machine.
- Measure the width between two holes on your button and set your machine stitch width to this measurement.
- On your machine, there should be a switch to lower the feed dogs underneath the presser foot. Lower them.
- Attach button presser food accessory.
- Place your button where you’d like it to go on your fabric.
- Carefully slide the fabric and button underneath your presser foot.
- Position button holes underneath the presser foot directly under the needle. The holes will be in between the side “teeth” of the button foot.
- Lower your presser foot.
- Set your machine to the free quilting zig-zag stitch (or whatever your machine’s button setting is as indicated by your manual).
- Set the stitch width to your measurement from step 2, and set the stitch length to zero.
- Carefully use your hand crank to lower the needle down into one hole.
- After the needle comes back up, keep cranking to see it go into the other hole. If it is too wide or too narrow, you’ll need to adjust your stitch width to ensure it will fit.
- Once you get it correct, you can use your pedal to continue stitching. Continue stitching for about 10 seconds.
- With your needle in the up position, slide your button forward to where the rear two holes line up in the presser foot. The width should be the same, so you won’t have to mess with the settings for that.
- Again, hand crank to lower the needle into the first hole – it will be the opposite hole from where you started! You should see a little “z” shape in the thread where it crosses over. Continue stitching the rear buttonholes for about 10 seconds.
- Once you are finished, be sure to do a few reinforcement stitches with that button on your machine.
- Snip off the thread and remove the fabric from the machine.
- Carefully pull the top thread to the bottom of the fabric (you’ll be able to find this close to the knot the machine tied off on the bottom).
- Locate the bobbin thread and tie the two thread ends together in a knot.
- Close to the knot you just tied, snip the threads off.
- Enjoy your new button.
Notes
(*This is for a 4 hole button. For a 2 hole button, please disregard step #8 )
Sewing machine disclaimer:
Every sewing machine has different settings, features, and tools. Your machine may differ slightly from this tutorial. This should be the general “gist” of how to use your machine to sew a buttonhole and a button, but please refer to your specific manual for directions for your individual machine. This was sewn on a Brother CS6000i – a wonderful, budget-friendly option for a sewing machine!
Recommended Products
As an Amazon Associate and member of other affiliate programs, I earn from qualifying purchases.


